Operation Rack-in-Progress

I managed to get a fully enclosed Server Rack for free. A business replaced their racks during a Server Room Re-model and no longer needed it.

This is like a dream come true. It also helped kick off the project i have been wanting to do for a long time.

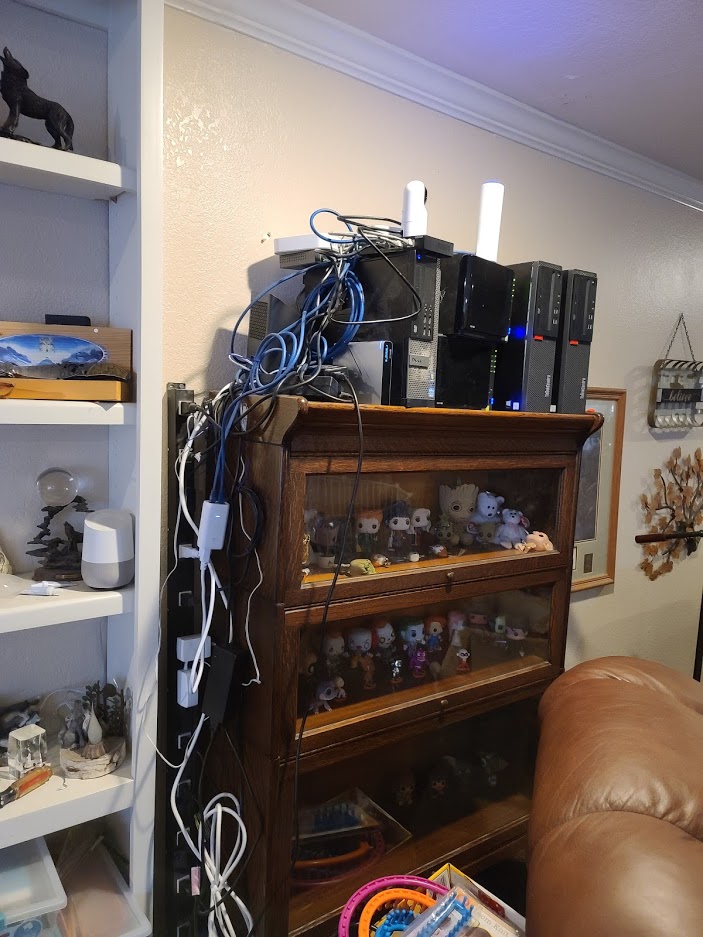
The basic Idea of the project is to hang Cameras, Multiple Wireless Access Points, and move the Home Lab into the Rack. Of course, I have other things I would like to accomplish at the same time, because is the Homelab ever really done? Here is an “almost” before Picture for reference.

I already started some of the project by adding a temp POE Switch and the Ubiquiti Cloud Key Gen2 Plus. Here is a list of some of the things there:

Optiplex 990 – PfSense
3 Various small network switches
Ubiquiti G3 Flex Camera
Ubiquiti Unifi FlexHD Access Point
2 Synology NAS
2 Desktop PC’s acting as “Servers”
Comcast Cable Modem under all the Cables

We were going to Put the Server rack in the Garage, but decided against it, since it gets so hot. We are now going to put it in the Laundry room. We are going to move a cabinet to the garage to make room. I have some family friends running the Cabling throughout the house for the 4 outside Cameras, 2 Access Points, and 2 Coax cables. One coax is for internet and the other is for a TV antenna to the Tuner I am adding in to Plex for OTA Broadcasts. We will get free Live TV and DVR Functionality.

I have also purchased a Cisco 3750-x POE Switch off Ebay. Finally going to have a REAL switch! This will let me have more control over my network and be able to segment using VLAN’s.

We really getting going now. Until Next time when the journey continues.

More Storage

I have been running 2 Synology’s for quite some time now. The first one has 4 bays, and I loaded it up with 4 x 8TB drives. In a raid 5 configuration, that gave my just under 22Tb usable. I was running out of space fast and I was able to pickup another Synology 4 bay, but this one already has 3 x 2TB drives. This helped for a little while, but i was again running out of space.

Luckily with all of the Sales leading up to Black Friday, i was able to pickup 3 x 12TB drives and replaced them 1 by 1.

After Replacing the 1st drive, it took about 4-5 hours to rebuild the array. I then replaced the 2nd drive and it took another 4-5 hours to rebuild the array, but this time when it was done, it expanded the capacity to a little over 12Tb which took another hour. (Very Interesting… )

I finally was able to replace the 3rd drive and it took another 4-5 hours to rebuild, but this time at the end it restarted the rebuild. That time it took 3 days and when it was done, it Expanded the capacity again for another couple hours.

When it was all said an done, I had this one sitting at just under 22TB usable, but i still have a spare bay when the drives go on sale again.

That will keep me going for awhile.

Batch File Menu System

I have been helping someone replace a bunch of computers on their network and decided to see if a could help speed things up a bit with a batch file.

Their Network is spread out across multiple sites and they only use static IP addresses. They refuse to have a DHCP server. This makes things fun….

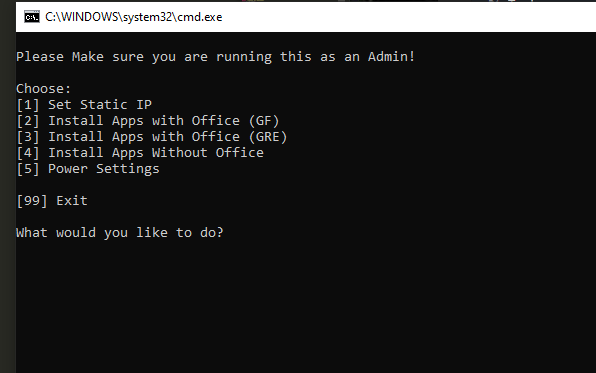
I came up with a simple batch file that Allows me to setup the network and install apps and set the power settings. Here is how I did it.

Needed a Menu system:

@echo off

:choice
cls
echo.
echo Please Make sure you are running this as an Admin!
echo.
echo Choose:
echo [1] Set Static IP
echo [2] Install Apps with Office (Site1)
echo [3] Install Apps with Office (Site2)
echo [4] Install Apps Without Office
echo [5] Power Settings
echo.
echo [99] Exit
echo.

SET choice=
SET /P choice="What would you like to do? "
if '%choice%'=='1' goto 1
if '%choice%'=='2'goto 2
if '%choice%'=='3' goto 3
if '%choice%'=='4' goto 4
if '%choice%'=='5' goto 5
if '%choice%'=='99' goto end
goto choice

So the first option we needed is to set the IP Address Information and DNS. When the User entered option 1 then they would be prompted to enter the Static Address, Gateway, Subnet and 2 DNS servers. It then sets the information on the computer and shows the IP information to verify it was set. It will pause and wait for a Key Press.Then once a key has been pressed it will go to the main menu again.

:1
@echo off
echo "Please enter Static IP Address Information"
echo "Static IP Address:"
set /p IP_Addr=

echo "Default Gateway:"
set /p D_Gate=

echo "Subnet Mask:"
set /p Sub_Mask=

echo "DNS 1:"
set /p DNS_2=

echo "DNS 2:"
set /p DNS_2=

echo "Setting Static IP Information"
netsh interface ipv4 set address name="Local Area Connection" static %IP_Addr% %Sub_Mask% %D_Gate% 1
netsh interface ipv4  set dns name="Local Area Connection" static %DNS_1%
netsh interface ipv4  set dns name="Local Area Connection" static %DNS_2% index=2

netsh int ip show config
pause
goto choice

Next I have 2 areas that are to install Applications including Office. The difference is that We have 2 different Product keys depending on the site where we are installing.

First part of the Applications install is to create a directory if it doesnt exist on the local hard drive called Installs

if not exist "c:\installs\" mkdir c:\installs

then lets copy teh installers to the local computer

copy AcroRdr*.exe c:\installs
copy ChromeSetup.exe c:\installs
xcopy "Office Standard 2013" c:\installs
copy SophosSetup-Endpoint.exe c:\installs

In order to to the Office Installs, I made a couple xml files and placed them in the Office Install Directory. Site1_config.xml and Site2_config.xml.

Content of XML files

<Configuration>
<Display Level="Basic" CompletionNotice="Yes" SuppressModal="No" AcceptEula="Yes" />
<PIDKEY Value="XXXXXXXXXXXXXXXXXXXXXXXXX" />
<Setting Id="AUTO_ACTIVATE" Value="1" />
<Setting Id="SETUP_REBOOT" Value="Never" />
</Configuration>

So based on the install selected, the next step is to rename the XML file to just config.xml. I actually used a copy command because that is how i like to do and I get to still keep the original one intact.

copy "c:\Installs\Office Standard 2013\Site1_config.xml" "c:\Installs\Office Standard 2013\config.xml"

Now that everything has been prepared, lets start installing.

START /W c:\Installs\AcroRdr*.exe
START /W c:\Installs\ChromeSetup.exe
START /W "c:\Installs\Office Standard 2013\setup.exe"
START /W c:\Installs\SophosSetup-Endpoint.exe

Office will see the config.xml file there and will follow the options selected in it.

The 3rd Applications install is everything but Office

if not exist "c:\installs\" mkdir c:\installs
copy AcroRdr*.exe c:\installs
copy ChromeSetup.exe c:\installs
copy SophosSetup-Endpoint.exe c:\installs

START /W c:\Installs\AcroRdr*.exe
START /W c:\Installs\ChromeSetup.exe
START /W c:\Installs\SophosSetup-Endpoint.exe
goto choice

Then we set the power settings to never turn off the computer, or Hard drive, and to disable Hibernation.

:5
powercfg.exe -change -disk-timeout-ac 0
powercfg.exe -change -standby-timeout-ac 0
powercfg.exe -h off
goto choice

Then we are done. It is super simple , but saves time on this project. The whole Script is saved as a batch file and Looks like this:

@echo off

if not exist "c:\installs\" mkdir c:\installs

:choice
cls
echo.
echo Please Make sure you are running this as an Admin!
echo.
echo Choose:
echo [1] Set Static IP
echo [2] Install Apps with Office (Site1)
echo [3] Install Apps with Office (Site2)
echo [4] Install Apps Without Office
echo [5] Power Settings
echo.
echo [99] Exit
echo.

SET choice=
SET /P choice="What would you like to do? "
if '%choice%'=='1' goto 1
if '%choice%'=='2'goto 2
if '%choice%'=='3' goto 3
if '%choice%'=='4' goto 4
if '%choice%'=='5' goto 5
if '%choice%'=='99' goto end
goto choice


:1
@echo off
echo "Please enter Static IP Address Information"
echo "Static IP Address:"
set /p IP_Addr=

echo "Default Gateway:"
set /p D_Gate=

echo "Subnet Mask:"
set /p Sub_Mask=

echo "DNS 1:"
set /p DNS_2=

echo "DNS 2:"
set /p DNS_2=

echo "Setting Static IP Information"
netsh interface ipv4 set address name="Local Area Connection" static %IP_Addr% %Sub_Mask% %D_Gate% 1
netsh interface ipv4  set dns name="Local Area Connection" static %DNS_1%
netsh interface ipv4  set dns name="Local Area Connection" static %DNS_2% index=2

netsh int ip show config
pause
goto choice

:2
if not exist "c:\installs\" mkdir c:\installs
copy AcroRdr*.exe c:\installs
copy ChromeSetup.exe c:\installs
xcopy "Office Standard 2013" c:\installs
copy SophosSetup-Endpoint.exe c:\installs
copy "c:\Installs\Office Standard 2013\Site1_config.xml" "c:\Installs\Office Standard 2013\config.xml"

START /W c:\Installs\AcroRdr*.exe
START /W c:\Installs\ChromeSetup.exe
START /W "c:\Installs\Office Standard 2013\setup.exe"
START /W c:\Installs\SophosSetup-Endpoint.exe
goto choice

:3
if not exist "c:\installs\" mkdir c:\installs
copy AcroRdr*.exe c:\installs
copy ChromeSetup.exe c:\installs
xcopy "Office Standard 2013" c:\installs
copy SophosSetup-Endpoint.exe c:\installs
copy "c:\Installs\Office Standard 2013\Site2_config.xml" "c:\Installs\Office Standard 2013\config.xml"

START /W c:\Installs\AcroRdr*.exe
START /W c:\Installs\ChromeSetup.exe
START /W "c:\Installs\Office Standard 2013\setup.exe"
START /W c:\Installs\SophosSetup-Endpoint.exe
goto choice

:4
if not exist "c:\installs\" mkdir c:\installs
copy AcroRdr*.exe c:\installs
copy ChromeSetup.exe c:\installs
copy SophosSetup-Endpoint.exe c:\installs

START /W c:\Installs\AcroRdr*.exe
START /W c:\Installs\ChromeSetup.exe
START /W c:\Installs\SophosSetup-Endpoint.exe
goto choice

:5
powercfg.exe -change -disk-timeout-ac 0
powercfg.exe -change -standby-timeout-ac 0
powercfg.exe -h off
goto choice

:end

Until Next time…

What is a Pi-Hole and why should you want one?

A Pi-Hole is a DNS server that will block Advertisements. Whjn you are on the internet and you are wanting to go to a website like google.com, your computer doesn’t know where that site is. So it asks fore the Address from a DNS server. That DNS responds with the Address and your computer goes to the site because it now has the Cyber-GPS coordinates for where it is going.

A Pi-Hole has a blacklist of Advertisements, and tracking websites, and will act as the Middle-man. Your computer will ask it for the address and if it has it in its Blacklist, then it will give a bogus response, and forward all valid sites to the Real DNS server you have configured.

This means that your computer never gets the Ads so it can show them to you. It also will cache DNS entries for some time and can speed up the response to your computer.

Pi-Holes were designed to run on a tiny computer called a Raspberry-Pi, but you are able to install the software on many other things. I have it running on my Plex Server and it is so light weight that it doesnt matter.

Once you setup the Pi-Hole Software then you tell your router to point to it for DNS queries and you can tweak it from there or just leave it. Everything that is gets an Address automatically from your Router should start using the Pi-Hole for DNS. You can login and see the Queries pretty close to realtime.

It can block Ads from all over the internet including many from Youtube and Mobile Apps. You should try it out today.

Setting Up Plex

What is Plex? and Why would I want it?

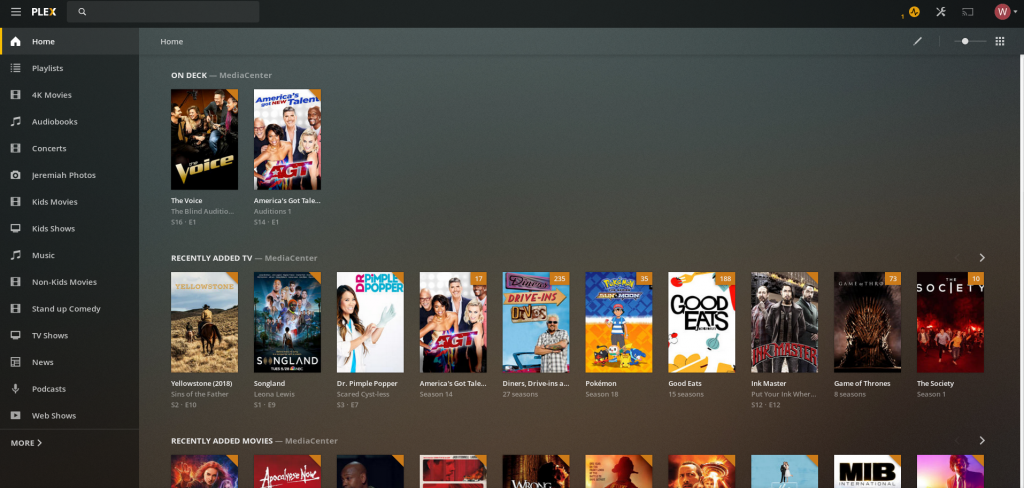
I like to tell people that it is like having your own personal Netflix with the Movies and TV Shows, Music, Photos, Live TV, and More that you own. The Plex Server can run on Windows, Mac, Linux. To get started it would help to the a couple things.

  1. A computer/Server or Nas where you want to Run Plex on
  2. Storage- where you want to store your media.

Plex is free for a basic setup and that is a great place to see if you can make it work for what you do.

Starting off many people just install on their PC and Run it from there. They will use the Hard drive that is already there. If you are like many of us and get in to it, then you will find that you will need more hard drive space. (I am up to around 25Tb and almost out of space)

Once you have figured out where you are going to do the install, then you can download Plex to that device. Click Here to download and then run the installer.

Once the Installer is complete then it should open a Web Browser so you can sign in or create an account. If the Browser doesnt Launch Automatically, then try going to the Default site at http://127.0.0.1:32400/web

It should start walking you through the setup wizard to name your server and then add libraries. There are 5 different types of Libraries you can setup. They are Movies, TV Shows, Music, Photos, and Home Video. Plex can only play Media without DRM (Digital Rights Management) on it. To Start off lets add one Library by pointing the Setup wizard to a folder that you have/will have Media in.

Plex will scan the folder and try to match it to online Databases to get the Information about it. Movie information like year, Cast, Ratings and Description.

The next step would be to test Media Playback. You can do this in the Web interface you are in or through one of the Man Apps out there. Plex has Client Apps for IOS, Android, Game Consoles, Smart TVS, Fire Stick, Roku, Apple TV, and More. The Interface is pretty similar on all of them. Try it out.

Once that is working, you can share Libraries with friends and Family. This is included in the Free version of Plex. In the Plex Settings, Click on Users & Sharing. and then under Friends Click on Share Libraries. I have found that it helps if the person signs up for a Plex account and activates it before you Share to them. You are able to select what libraries to share out, and even Ratings.

There is another Type of Sharing/User on this screen, and that is Home Users. Home Users are a Paid Feature, but well worth the cost. When you add plex to a TV in the house, by Default you have access to all Libraries, and the Play History goes under the Main account. With Home users, then you can setup “Profiles” for each user in the house. Everyone has their own Play List and the Media can be locked down. This is great for Families with kids. You are able to set PIN numbers to the profiles.

This is a good Start on Using Plex, but we have a lot more to do. Soon We will add more Services and make it even more Usable.

Automatic Ripping With Linux

I followed a Tutorial to get this done a couple years agao and it has been working great. I have modified the process on my setup, but here is the link to the original directions that I followed. https://pathar.tl/blog/the-ultimate-automated-ripping-machine/#more-5603

I am going to copy it to here in case the site does change:

The Ultimate Automated Ripping Machine

Recently I built myself a nice media center. I obtained a 16×3.5″ bay IBM server case. It’s 4U tall and really makes one hell of a system. This case is very, very big so I probably shouldn’t be using it as a media center case but what’s technology if you don’t over do it here and there.

One of the things that always frustrated me was ripping media such as CD’s and DVD’s. I either had to rip by hand, or… well rip by hand. Later on kept finding “one click rip” solutions, but there were two issues. First of all, it was never really one click. Second of all, I didn’t find one click acceptable. I wanted no clicks. I attempted this a couple of years ago at a previous job with a machine loaded with 4 DVD drives which was so famously dubbed the Ripasaurus. That was running on Windows. Now I’m a couple years older, and a couple years wiser so I decided to base my media center off Linux. Finally, Ripasaurus is reborn.

First I just want to outline the system I have running right now. It’s probably overkill, but hey it gets the job done. At the heart of the system is a Intel Core i5 3350P. This alone has made this the best media center I’ve ever built, and trust me, I’ve built a lot. I’m running on 4GB of DDR3 1333MHz RAM which runs just fine. To get better image quality (and the possibility of running some games) I dropped in a Nvidia Geforce GTX 460. For storage I’ve got a 32GB Sandisk SSD running my OS and 3x3TB Western Digital Red hard drives for my main storage. The hard drives are formatted for ZFS and they run in a RAID-Z just to make things a bit safer. Finally, I’ve got a Pioneer Blu-ray ROM drive I picked up off Amazon. This will be our best friend in this post.

Alright, let’s do some business.I will separate this post into sections as we will be covering how to rip audio CD’s, DVD’s, and Blu-ray discs. We will be running the DVD and Blu-ray rips through our friend Handbrake to give us a bit better file sizes and a lot more compatibility with software like XBMC.

Audio CD’s

Audio CD’s are pretty simple. We only really use one program, ABCDE (A Better CD Encoder). I’m running Ubuntu, so installation is a snap:

sudo apt-get install abcde

After ABCDE is installed, we need to make a config file. Open up your favorite text editor and save the text below in your home directory as .abcde.conf (~/.abcde.conf)

CDROM=/dev/sr0
OUTPUTTYPE=flac
INTERACTIVE=n
PADTRACKS=y
EJECTCD=y
OUTPUTDIR=/data/Music

OUTPUTFORMAT='${ARTISTFILE}/${ALBUMFILE}/${TRACKNUM}. ${TRACKFILE}'
VAOUTPUTFORMAT='Various-${ALBUMFILE}/${TRACKNUM}.${ARTISTFILE}-${TRACKFILE}'

ONETRACKOUTPUTFORMAT='${OUTPUT}/${ARTISTFILE}-${ALBUMFILE}/${ALBUMFILE}'
VAONETRACKOUTPUTFORMAT='${OUTPUT}/Various-${ALBUMFILE}/${ALBUMFILE}'
mungefilename ()
{
   echo "$@" | sed s,:,-,g | tr / _ | tr -d \'\"\?\[:cntrl:\]
}

Obviously you’ll want to replace some information in this config with your own. My source drive by default was /dev/sr0 and I wanted my output to be in /data/Music as defined by OUTPUTDIR. The rest of he stuff I wouldn’t worry about. It places an album under the format Artist/Album/Track.ext

After this is created, you’ll want to make sure that ABCDE is ran when you insert a disc. We can utilize MIME types for this situation. Ubuntu (and I think all Debian distros? Don’t quote me on that) uses .desktop files for defining what applications can open what kinds of files along with a custom MIME type list. Lets make our CD ripping .desktop application file. Save the text below as /usr/share/applications/ripcd.desktop

[Desktop Entry]
Name=Rip CD
Comment=This will start the automated CD ripping process
Exec=abcde
TryExec=abcde
MimeType=x-content/audio-cdda
Type=Application

If we didn’t have the MimeType definition, this would look like any other program. But that line lets us do just a little bit more. For lack of a better word it tricks the system into thinking that our program will play the CD.

We’re going to want a second file created that we will reference later. Copy paste the following into ~/.local/share/applications/mimeapps.list

[Default Applications]
x-content/audio-cdda=ripcd.desktop;
x-content/video-dvd=ripdvd.desktop;
x-content/video-bluray=ripbluray.desktop
[Added Associations]
x-content/audio-cdda=ripcd.desktop;
x-content/video-dvd=ripdvd.desktop;
x-content/video-bluray=ripbluray.desktop;

If you won’t be doing DVD or Blu-ray ripping you can take those lines out.

In Ubuntu if you go to System Settings > Details > Removable Media and then click on the Audio CD drop down, you’ll notice our Rip CD program is listed. Choose this as your default. At this point you can pop in a disc and watch it rip. Note since this is a no-click solution, you won’t be notified of any errors and the only feedback you’ll get is when the tracks are created into files or the purring of the optical drive.

DVD’s

Time to move onto DVD’s. These are a bit trickier as we first have to break the encryption on the disc and rip it to the hard drive. Then we have to convert it to a better format for us to play. First thing you’ll want to do is install dvdbackup:

sudo apt-get install dvdbackup

We also need to install libdvdcss to allow us to break DVD encryption. We’ll also need to install git (it’s usually the first thing I install on any machine along with vim) and clone the libdvdcss repo.

sudo apt-get install git
git clone git://git.videolan.org/libdvdcss

Now we compile and install libdvdcss

./configure
make
sudo make install
echo '/usr/local/lib' > /etc/ld.so.conf.d/libdvdcss.conf
ldconfig -v

We’ll also need Handbrake to do the video conversion for us

sudo add-apt-repository ppa:stebbins/handbrake-snapshots
sudo apt-get update
sudo apt-get install handbrake-cli handbrake-gtk

I usually install both the GUI and CLI versions of Handbrake. We’ll need the CLI in our script, but I end up using the GUI to make my encoding presets.

And now we can build our DVD ripping script. Save this as /usr/bin/ripdvd

#!/bin/bash

OUTPUT_DIR="/data/Ripping/DVD"
SOURCE_DRIVE="/dev/sr0"
HANDBRAKE_PRESET="AppleTV 2"
EXTENSION="m4v"

function rip_dvd() {

        # Grab the DVD title
        DVD_TITLE=$(blkid -o value -s LABEL $SOURCE_DRIVE)
        # Replace spaces with underscores
        DVD_TITLE=${DVD_TITLE// /_}

        # Backup the DVD to out hard drive
        dvdbackup -i $SOURCE_DRIVE -o $OUTPUT_DIR -M -n $DVD_TITLE

        # grep for the HandBrakeCLI process and get the PID
        HANDBRAKE_PID=`ps aux|grep H\[a\]ndBrakeCLI`
        set -- $HANDBRAKE_PID
        HANDBRAKE_PID=$2

        # Wait until our previous Handbrake job is done
        if [ -n "$HANDBRAKE_PID" ]
        then
                while [ -e /proc/$HANDBRAKE_PID ]; do sleep 1; done
        fi

        # HandBrake isn't ripping anything so we can pop out the disc
        eject $SOURCE_DRIVE

        # And now we can start encoding
        HandBrakeCLI -i $OUTPUT_DIR/$DVD_TITLE -o $OUTPUT_DIR/$DVD_TITLE.$EXTENSION --preset=$HANDBRAKE_PRESET

        # Clean up
        rm -R $OUTPUT_DIR/$DVD_TITLE
}

rip_dvd

Make it executable

sudo chmod +x /usr/bin/ripdvd

Now you can throw a disc in the drive and type ripdvd and watch the script do its magic. That’s not zero click, so we have to do the same thing with our audio cd’s and make a .desktop file. Save this as /usr/share/applications/ripdvd.desktop

[Desktop Entry]
Name=Rip DVD
Comment=This will start the automated DVD ripping process
Exec=ripdvd
TryExec=ripdvd
MimeType=x-content/video-dvd
Type=Application

Go back to System Settings > Details > Removable Media and change the DVD video disc option to our Rip DVD program. Now you can pop a disc in the drive and it will rip and encode our DVD. Don’t worry about sticking discs in while Handbrake is still encoding. Since ripping the DVD itself uses barely any processing power, you can start ripping the next disc while the last one is encoding with Handbrake. If you queue up another disc, it will wait until the previous Handbrake job is finished before ejecting.

Blu-ray

The moment we’ve all been waiting for, a zero click solution for ripping Blu-ray. This method works almost exactly like ripping DVD’s. First we need to get an unencrypted rip of the disc on our hard drive, then we’ll encode it using Handbrake. First we’ll need to install some programs. The first one is MakeMKV. This will do the actual ripping and decryption for us. Just a little note, this program is not FOSS and does cost $50.

We’ll need some tools to help us with compiling and installing MakeMKV

sudo apt-get install build-essential libc6-dev libssl-dev libexpat1-dev libavcodec-dev libgl1-mesa-dev libqt4-dev

Now download the binaries and source for MakeMKV

wget http://www.makemkv.com/download/makemkv-bin-1.8.6.tar.gz
wget http://www.makemkv.com/download/makemkv-oss-1.8.6.tar.gz

Extract

tar xvzf makemkv-oss-1.8.6.tar.gz
tar xvzf makemkv-bin-1.8.6.tar.gz

Now we’ll go and run make and make install in each directory

cd makemkv-oss-1.8.6
make -f makefile.linux
sudo make -f makefile.linux install
cd makemkv-bin-1.8.6
make -f makefile.linux
sudo make -f makefile.linux install

Cleanup time

rm -R makemkv*

And now we can build our script. Save this as /usr/bin/ripbluray

#!/bin/bash

OUTPUT_DIR="/data/Ripping/Bluray"
SOURCE_DRIVE="/dev/sr0"
HANDBRAKE_PRESET="AppleTV 2"
EXTENSION="mkv"

function rip_bluray() {

        # Grab the DVD title
        BLURAY_TITLE=$(blkid -o value -s LABEL $SOURCE_DRIVE)
        # Replace spaces with underscores
        BLURAY_TITLE=${BLURAY_TITLE// /_}

        # Backup the DVD to out hard drive
        makemkvcon backup disc:0 $OUTPUT_DIR/$BLURAY_TITLE --decrypt

        # grep for the HandBrakeCLI process and get the PID
        HANDBRAKE_PID=`ps aux|grep H\[a\]ndBrakeCLI`
        set -- $HANDBRAKE_PID
        HANDBRAKE_PID=$2

        # Wait until our previous Handbrake job is done
        if [ -n "$HANDBRAKE_PID" ]
        then
                while [ -e /proc/$HANDBRAKE_PID ]; do sleep 1; done
        fi

        # HandBrake isn't ripping anything so we can pop out the disc
        eject $SOURCE_DRIVE

        # And now we can start encoding
        HandBrakeCLI -i $OUTPUT_DIR/$BLURAY_TITLE -o $OUTPUT_DIR/$BLURAY_TITLE.$EXTENSION --preset=$HANDBRAKE_PRESET

        # Clean up
        rm -R $OUTPUT_DIR/$BLURAY_TITLE
}

rip_bluray

And make it executable

sudo chmod +x /usr/bin/ripbluray

Just like for ripping audio CD’s and DVD’s we’ll need a .desktop file. /usr/share/applications/ripbluray.desktop

[Desktop Entry]
Name=Rip Blu-ray
Comment=This will start the automated Blu-ray ripping process
Exec=ripbluray
TryExec=ripbluray
MimeType=x-content/video-bluray
Type=Application

Go back to System Settings > Details > Removable Media and you’ll notice there’s no Blu-ray option. Click the additional media button and look for Blu-ray video disc. Change this to our Rip Blu-ray program. That’s it. Zero click blu-ray ripping with a script and a couple of programs.

Just a few final notes, you can encode to other filetypes for each of these media types. Audio CD’s are controlled by ~/.abcde.conf, while DVD’s and Blu-rays are encoded according to Handbrake presets. If you make a Handbrake preset that you really like, save it and then replace the HANDBRAKE_PRESET value in each script. Feel free to change around the scripts. If you find something that makes the ripping process faster or better, leave a comment!
Here we go again…

I lost count a long time ago how many times i have rebuilt this site. I am never happy with the way it turns out, and when i move hosts, it isn’t high on my list to backup and restore to the new host.

I have other sites that i cant loose and so i focus more on those.

This time i am going to take a different approach. This time it wiull be be geared towards me and my thoughts and interests rather than my consulting and other things.

More to come…